|
Backup
Your Node! (DO IT!)
There are a couple of easy ways to backup your node software. One is a built-in script called backup_for_reinstall. When you run it, it will create a backup directory on your node, compress everything you need to reinstall into a single file, and put it into the backup directory. Should there be a catastrophic loss, you somehow screw something up, or you upgrade the operating system (ie RH9 to FC3), you can restore from that file without losing your node number and settings.
As root:
/home/irlp/scripts/backup_for_reinstall
You'll see names of files scrolling by as they are backed up. After it's done, look in /home/irlp/backup for a file called irlp_backup.tgz.
Windows users will likely prefer using a program like WinSCP to copy the /home directory and all of its contents to their Windows machine hard drive for safe keeping. That has the added advantage of being able to look at or compare files without having to uncompress them from the backup. It's comforting to know that you can undo a fubarian move by copying a file back into the appropriate directory.
I use both methods. Also see Restore Your Node From Backup.
BACK to last Menu
|
|
|
CD
Change into directory
The cd command is used to change directories, just as in MS-Dos.
For instance:
CD directoryname
will take you to any sub-directory of the one you are currently in (directory within the directory you are in).
To move to the parent directory of the one you are in (the level above where you are), you can use the same shortcut used in MS-DOS
CD..
Note the two periods after the space, after CD
If you need to move more than a level or two, it is easier to specify the full path and move directly into the desired directory with one command. If you were in the irlp directory and wanted to move to the S69 directory under custom, under audio, under irlp, you would do:
CD audio/custom/S69
You don't use the leading / for the first level down from where you are, so there's no / before audio. You would use the leading / if you were trying to go into a directory above your current level.
In order to get back to the irlp directory from the S69 directory above, you could CD .. three times, or you could specify the exact path. In order to do the direct path method, you also need to know the structure of the whole tree. In other words, you would not only need to know that you want to go to the irlp directory, but that the irlp directory is a child of the home directory in the root of the drive. So, the command:
CD /home/irlp
would be needed to get you back into the irlp directory.
You can also do it with
CD ../../..
since .. means to go back one level. That line literally means go back a level above the level above this level.
BACK to last Menu
|
|
|
|
CHMOD
Change permissions
Understanding file rights and ownership is
something that I've had the most trouble with since getting into this
Linux thing. I will try to explain them in such a way that you
can gradually understand them. It has taken me literally days of writing
and rewriting this to get it clarified even to myself. I learned a long
time ago that the best way to learn something is to try to teach it to
others. You find out right away just how little you really know about
it. There are some paragraphs here that you will need to read over and
over again to digest. My apologies if this doesn't help you. It certainly
helped me to write it.
The chmod command allows you to change access
rights to files and directories. All files and directories have certain
permissions assigned to them that give the
users certain rights. I may use the words right and permission interchangeably
in this text.
You can see permissions assigned to the files
in a directory by using the ls -alt command. Doing so in a directory such
as custom, you might see something like:
There's lots of information presented
there. All you have to do is figure out what it means! Let's see if I
can shed some light on some of it.
Non-graphically, for the visually
handicapped, sample lines for the rc.irlp and environment files look like
this:
-rwxr-x--- 1 root root 3240 Feb
17 17:34 rc.irlp
-rwxr-x--- 1 root repeater 4792
Apr 14 00:05 environment
Skipping to the easy stuff first,
on the right, you see the filenames. The blue single and double dot entries
in the image are for parent directories. Moving to the left, the time
and date that the file or directory was created or last modified, and
the size are given. At this time, I don't know why the time is replaced
by the year in some cases. If someone knows, let me know and I'll put
it here. Left of middle shows ownership on
the left, and group on the right. For instance,
rc.irlp is owned by user
root and belongs to the group root.
The file environment is owned by root
and is in the repeater group.
A group is a
way of assigning multiple users the same
rights/permissions to files and directories in that group. Only root can
assign users to groups.
What about all those -rwxr-x--- gobbledygook
letters over on the left?
d means the
item is a directory, rather than a file
r means the file or directory is readable (viewable)
w means the file or directory is writable (edit
or modify the file)
x means the file or directory is executable (can
be run if it is an executable)
- means the file or directory has no permissions
assigned
The columns that the letters appear in are
assigned. The first one is set aside for
indicating a directory. After that, they
are in groups of three. The first group of three letters indicates permissions
for you the user. The second group of three
letters indicates permissions for your group.
And, the third group of three letters indicates the permissions of other
users.
The line for rc.mixer shows -rwxr-x---, indicating
it is a file (no d in first column). Further, I have read, write, and
execute permissions, the group has read and execute permission, and other
users have no permissions at all.
I'm "familiar" with a couple of
ways to change permissions at the console.
With one method, you use a series of letters
and symbols in specific order to assign rights to a file. You start with
the "who" position, given as one of u for user, g for group,
o for other, or a for all. Next, you specify whether you are changing
the whole value with =, or adding a value with +, or removing a value
with -. The next letter specifies the right you are assigning with the
action. It would be given as r for read, w for write, or x for execute.
Examples using the file foo.
If you wanted to give everyone read, write, and execute rights, you could
use:
chmod ugo=rwx foo
Because a (all) means the same as ugo, it
could also be shortened to:
chmod a=rwx foo
meaning all may read, write, and execute the file.
To turn around and revoke write permission
from group and other
on the same file, you could use:
chmod go-w foo
To demonstrate adding a right, I could add
back the write permission to group with:
chmod g+w foo
You can also chain commands with a comma between:
chmod g+w,u-w foo
would give write permission to the group
and take write permission from user.
There are all sorts of angles you can come
at this from. Here's a much easier one to understand, and one that WinSCP
can use directly.
A simple line like:
chmod 751 rc.irlp
can be used to assign rwx to user, rx to
group, and x to other.
But where did you I get the 751 from?
It came from this chart:
7 full
6 read and write
5 read and execute
4 read only
3 write and execute
2 write only
1 execute only
0 none
If you want to assign your user
permissions to full, group's permissions
to read and execute, and other users to execute
only, the number from the chart is 751. Use 7 for you the user,
the 5 for the group, and the 1 for other
users. Use the chmod command to assign them to the file.
chmod 751 rc.irlp
assigns permissions as -rwxr-x--x
To make the same change from within WinSCP,
simply right click the rc.irlp file, click properties, and change the
permissions box to read 0751. Click OK and then refresh the window.
For those who know about the concept, you
can relate the above to bit mapping.
In the chmod 751 rc.irlp command above, I assigned read and execute permission
to the group with the number 5. The number
5 actually represents a bit total for that position, and is determined
by adding the three bit values of read plus
write plus execute.
The left bit is assigned to read permission, and has a value of 4 or 0
(on or off). The middle bit is assigned to write permission, and has a
value of 2 or 0 (on or off). The last bit is assigned to execute permission,
and has a value of 1 or 0 (on or off). So, to assign read, no write, and
execute permission, you would add the bits,
4 for read, plus 0 for write (permission turned off), plus 1 for execute,
equals 5. This correlates to 5 on the chart above for read and execute.
BACK to
last Menu
|
|
|
|
Chown
Long
(this will be rewritten and shortened as time
permits-for now it's here in case you need it)
This needs to be changed. It was received
from someone else and hasn't been cleaned up. I'll leave it for now, but
will got through it sometime in the future. It contains info on multiple
commands.
CHOWN(1) User Commands
CHOWN(1)
NAME
chown - change file owner and group
SYNOPSIS
chown [OPTION]... OWNER[:[GROUP]] FILE...
chown [OPTION]... :GROUP FILE...
chown [OPTION]... --reference=RFILE FILE...
DESCRIPTION
This manual page documents the GNU version of chown. chown changes
the user and/or group ownership of each given file, according to its first
non-option argument, which is interpreted as follows. If only a user name
(or numeric user ID) is given, that user is made the owner of each given
file, and the files' group is not changed. If the user name is followed
by
a colon or dot and a group name (or numeric group ID), with no spaces
between them, the group ownership of the files is changed as well. If
a
colon or dot but no group name follows the user name, that user is made
the
owner of the files and the group of the files is changed to that user's
login group. If the colon or dot and group are given, but the user name
is
omitted, only the group of the files is changed; in this case, chown
performs the same function as chgrp.
============ ============= ============= =============
Jude <jdashiel@shellworld.net>
Subject: An overview of users, groups and
file permissions
Hi everyone:
As I said in a message yesterday, I am about
4 or so days behind in my
mail reading, so I strongly apologise if this has all been clarified already.
I have just been reading the thread dealing with file permissions and
there
seems to be a bit of confusion about how it all works, so I thought I'd
write a short note of explanation to clarify it all and put it all in
one
place.
To start with, every user on a linux system
has an account and an
associated user-ID number. There are also special user accounts set aside
for system processes, most notably that of mail. The details for all user
accounts, including these so-called pseudo-users, can be seen in the file
/etc/passwd. This typically lists the account names along with their
user-ID numbers, and also contains the kind of information you typically
see with finger, such as home directory, login shell, phone number (if
filled in), etc. The password is encrypted, and if you have
shadow-passwords enabled, the encoded password will be stored in
/etc/shadow. To alter passwords, use the passwd command. You can change
any account's password as su/root without knowing the old one (just type "passwd accountname"). The login shell can be changed with chsh.
The
finger information (like name, phone, etc), can be changed with chfn.
OK, that's sorted that out. Users can also
be in one or more groups.
Group information is stored in /etc/group and is in fact some-what meant
to be manually edited. So after you make a group with addgroup, you can
edit /etc/group and put names in it. I'll show you an example from my
/etc/group file
audio:x:29:geoff,amanda
Note that the syntax is pretty important and
I've had stuff not work when
something added a rogue space in there (it wasn't me, your honour). This
example means that Amanda and I have group access to the audio group,
which provides us with read/write access to the audio devices. This also
provides me as sysadmin the ability to prevent access to some programs
based on this, if I so chose. Another example is the dip group. Debian
installs all the PPP stuff with the group owner of dip (presumably dial-up
IP). This means that anyone in the dip group can put the PPP connection
up without anyone else aside from SU being able to do it. I'm sure you
can appreciate the advantages of this approach. This also illustrates
the
point that there may already be groups set up to do a particular job you
need done, so check these out before bothering to create your own.
OK, now to files. To see the permissions on
a file, use "Ls -l". At the
left end of a file listing, you will see a 10-character string listing
how
the permissions are set. It might look something like this:
drwxr-xr-x
The first character designates the type of
file, and d is for
directory. The next 3 are user permissions, the next 3 are group
permissions and the last 3 are the permissions for everyone else. So,
this example gives a directory which is readable and executable by everyone
and writable by the owner. An executable directory is one that can be
entered, kinda important for say, an FTP site.
Following the FTP example, you might want
to set an incoming
directory. Say you have a group called ftp-admin which is a group of
users who administer your FTP area. The directory is owned by root. You
want the admins to be able to examine and move incoming files so you don't
have to do it all, and you want people with anonymous FTP access to merely
be able to upload files and nothing else. You'd set up your permissions
as
follows:
drwxrwx-wx 1root ftp-admin 1024 Jun 14 20:28
incoming
So how do you do this? Well, there are 2 ways
to set permissions with
chmod. One uses octel representations of the permissions, with 4 for
read, 2 for write and 1 for execute. So the above would be 775. This can
be a little confusing though if you didn't have enough coffee this morning,
particularly if you just want to change existing permissions, so there
is
also a way to add or subtract individual permissions. You do this by
using a letter designating user, group or other (U, G or O), a plus or
minus depending on whether your adding or subtracting, and then the
permission (R, W or X). So to make that incoming dir word-readable,
you could type:
chmod o+r incoming
Or if you wanted to remove the group read
permission from the same
directory you could type:
chmod g-r incoming
Of course, there will be times when it is
quicker to use the numbers, so
it's really up to you as to which you want to use.
OK, so how do we set owners and groups? With
the chown command. This
command is pretty self-explanatory so I'll let you read the manpage, but
for a simple example:
chown root.ftp-admin incoming
Changes owner of incoming to root and group
to ftp-admin.
chown geoff state-secrets.txt
Changes owner to geoff and leaves group intact.
A good time to use this
command is if you download a batch of files in a tar archive and the
owner/group permissions are screwy. You can use wildcards with chown
which is also cool. sometimes I copy files into Amanda's home directory
and forget to change the ownership so she can actually read them, and
a
quick wildcard chown is just what's needed to fix it and save further
embarrasment.
So what determins the default permissions?
Your umask. this is
probably set by a script, but you can of course change it with the umask
command. What it is is a set of permissions that, when subtracted from
777, determines your file permissions. So my user account mask of 002
will lead to a default permission on files I create of 775 or rwxrwxr-x.
To check your umask, type "umask". Of course, you can always
chmod the
files afterwards.
One thing left. What's this set UID root thing?
Note that this can be
dangerous so be careful with it. There is an extra bit in the execute
permissions that do certain things. The extra bit in the user tells the
file to assume that it is the user owner that is actually using it. So
if
a program is set UID root, the program will act as if root is running
it,
regardless of who is actually running it. Obviously, you'll never want
to
set, say, rm as set UID root. Nice and dangerous.
So how can you see what's set uid root and
how do you set it? Well, if a
program is set uid, the x in the user set will be replaced with an s.
You
can therefore do a "chmod u+s programname" to set it. It's also
possible
to do it numerically, but I'm not sure how to do it (never have). To find
out how and to see what the so-called "sticky bit" for the other
fields
do, check the chmod manpage.
Hope all this helps someone.
Geoff.
kaare,
Don't know about the symbolic stuff, but here
is how I keep it straight.
When you do a, say, Ls -la you get something
like this:
drw-r--rwx foo
Break it out into 4 parts. First character:
directory, link, whatever.
Next 3 characters: user
Next 3 characters: group
Next 3 characters: world
Each 3 characters are represented by a number.
From left to right it's
4 2 1.
So in the above example the directory foo
has 647 permissions.
rw- equals 4+2+0
r-- equals 4+0+0
rwx equals 4+2+1
BACK to
last Menu
|
|
|
|
Clock
Setting on the Node Computer
To check the computer date and time:
date
To set the date and time:
date mmddhhmmyyyy
where mmddhhmmyyyy is the 2 digit month+2
digit day+2 digit hour+2 digit minute+4 digit year
Example - it's 0048 (local) on April 3, 2005.
The command to set the clock to that time is:
date 040300482005
After setting the time, check it again with
the date command to be sure you did it right. If it is correct, you can
write it to the cmos hardware clock with the command:
hwclock --systohc
I highly recommend installing ntp to keep
your clock up to date. It came installed on the RH7.x and FC3 versions,
but not with RH9. Once installed, it is trouble-free. I needed a ton of
help with the installation and don't remember enough of that process to
write it up at this time, but hope to in the future.
After ntp is installed and running, you can
add the cmos clock setting command to the crons to run once a day if you
like.
From Dave, K9DC, here is a good explanation
of the reference files for time:
The daylight/standard behavior,
amount of offset and date of the change is controlled by the file referenced
in ZONE. For example, if ZONE="America/Chicago" the node changes
its zone from CST to CDT on the appropriate date. If ZONE="America/Indianapolis"
the nodes stays on EST year round (we do not observe daylight time in
most of Indiana). All of the various timezone files are buried in /usr/share/zoneinfo/
and subdirectories, such as /usr/share/zoneinfo/America/Indianapolis.
Basically, find a city in
zoneinfo structure that behaves exactly like your timezone and stick that
in the ZONE field. Reboot the machine, set the clock (or let ntp do it)
and all will handled from that time on.
If you have the timeconfig
utility on board (FC3), just run that. If you are using the IRLP version
of RH9, you will have to mess with /etc/sysconfig/clock manually, since
timeconfig was left off of the RH9 IRLP CD.
The significance of this is
that all cron jobs consider the time of day of the local timezone, even
if the hardware clock is set to GMT. So if you want your nightly updates
to occur 03:00 local time (or anything else you want to run based on local
time), then your node needs to be set in the correct local timezone. Setting
your node to "GMT -6" means your node may be off local time
by an hour for half the year (Central time right now is GMT-5, in the
winter it is GMT -6).
Oh, by the way... any USER
on the system CAN be set to a different timezone with user environment
variables. :)
-Dave K9DC
BACK to
last Menu
|
|
|
|
Computer
Name Change
As root, edit
your hostname in /etc/sysconfig/network (won't take effect until reboot
or reloading network config).
Short story: I used this recently
to change the computer name on a visually handicapped friend's node so
it would be easier* for me to be sure which
computer I was remotely logged into. In this particular case, it created
a problem that scared us a bit. I changed the name and then rebooted the
computer. When it came back up, I couldn't log into it from the Internet,
and he couldn't log into it from his LAN. He didn't even have a monitor
on his node computer, so the option of logging in from the console would
be difficult (I've talked someone through it though). After unsuccessfully
trying several times to log in, I tried connecting to the node from mine
to see if it might actually be up and running. It was! Whew, it wasn't
completely broken. Keeping the story short, I talked with someone about
how I might to reestablish remote access. He suggested that we try to
Telnet into the node. Telnet is not normally enabled on a stock installation,
but it happened to be on this one. Since we were able to get into it,
the next suggestion was to restart the sshd service. Obviously, access
to the console would have been less stressful. To restart sshd,
As root:
service sshd restart
That fixed it. WinSCP and
Putty worked locally and remotely. Why this happened, we don't know. If
it happens to you, login and restart sshd service as above. It won't hurt
a thing, and in our case, it fixed it. We rebooted a couple of times,
even shutting it completely off for awhile, to be sure it was going to
be good at startup. All was good again. It is possible that a second reboot
in the beginning might have fixed it. But, the node was up and running,
I was still gathering ideas to try, and I didn't want to take a chance
on breaking it completely.
*The
computer name is displayed as a part of the prompt while you are logged
in.
BACK to
last Menu
|
|
|
|
Connects
While Channel Busy
Controlling connects while the channel is busy (default
is to disallow)
On most nodes, if you try to connect to them
while there is activity on the channel (COS active), you will "The
node you called is being used locally." That's because the default
setting is to not interrupt a QSO already in progress. Any valid signal
on the IRLP node receiver, whether it is a repeater node, or a simplex
node, will prevent someone from connecting. If you to WANT people to be
able to connect while the frequency is in use, you can change it. In the
environment file, there is a line that reads export
REPORTBUSY=YES. In mine, it is on line 28. If you change that line
to read export REPORTBUSY=NO, calling nodes
will be allowed to connect, even though there is activity on channel.
Note: Neither end will actually receive a
connect message until the COs active state changes to inactive (node input
is quiet).
BACK to
last Menu
|
|
|
|
Custom
Decode
Why dial all those digits for nodes and reflectors
you connect to frequently?
Custom_decode is probably the first file you
need to get familiar with after you get your node on the air. You can
do so much neat stuff with it. You could even turn the coffee pot on with
it if you wanted (true)! Below, are some samples out of my custom_decode
file, with some commands changed to protect the snoopy. 
First, you need an ON-OFF command. One theme
you'll see throughout my commands is using 0 for OFF and 1 for ON. It's
easier to remember. So, if I say 71 is going to be my OFF-ON control,
I use 710 for OFF, and 711 for ON. See below. Notice I've put two commands
on the line for OFF. While not necessary, I wanted to be sure the node
wasn't connected before disabling it. 710 disconnects the node if it is
connected, and then shuts the node down. If it isn't connected, the disconnect
doesn't hurt a thing.
Next, I wanted to have shortcuts for connecting
to my favorite nodes and reflectors. In this case, I used star as a prefix
for nodes, and pound for reflectors. Additionally, I wanted to disconnect
from anything I was already connected to before connecting to the desired
destination. Remember, star is designated with capital S and pound with
capital P. If you would rather be warned that you are already connected,
leave out the portion below.
"$SCRIPT"/end ;
Notice that node 3148's shortcut has notimeout
after it. That disables the activity timeout timer on both
nodes. Normally, the node with the shortest timer controls the link, but
with notimeout added, the nodes will stay connected until one or the other
manually disconnects.
After the node and reflector shortcuts, you
can see some commands that I'm experimenting with. They are rem'd (remarked)
out so that they are disabled. This is how you can put test commands in
and disable them when you aren't working on them.
Below that, are two version of *69 (star sixty-nine).
The first is an actual *69 function and the second just gives a report
of the last call waiting, incoming, and outgoing calls.
The 0 (zero) command gives the node status
(connected to xxxx or link clear), and the 1 command announces the time.
Look through these commands and see an additional
note at the end. You should see from what is below how to do most of the
common commands.
#!/bin/bash
# This is the custom decode
file. Make sure all valid codes exit with "exit 1".
if [ "$1" = "710"
] ; then "$SCRIPT"/end ; "$SCRIPT"/disable ; exit
1 ; fi
if [ "$1" = "711" ] ; then "$SCRIPT"/enable
; exit 1 ; fi
# Frequently called nodes
and reflectors
if [ "$1" = "SA" ] ; then "$SCRIPT"/end
; call stn3936 ; exit 1 ; fi
if [ "$1" = "SB" ] ; then "$SCRIPT"/end
; call stn3148 notimeout ; exit 1 ; fi
if [ "$1" = "PA" ] ; then "$SCRIPT"/end
; connect_to_reflector ref9200 ; exit 1 ; fi
if [ "$1" = "PB" ] ; then "$SCRIPT"/end
; connect_to_reflector ref9453 ; exit 1 ; fi
# For Idle_Connect - connects
to specified node/reflector if there's no other activity
#if [ "$1" = "C1" ] ; then ("$CUSTOM"/idle_connect
&) ; exit 1 ; fi
#if [ "$1" = "C0" ] ; then ("$CUSTOM"/idle_connect
die &) ; exit 1 ; fi
# Star 69 functions
if [ "$1" = "S69" ] ; then "$CUSTOM"/callback
; exit 1 ; fi
if [ "$1" = "P69" ] ; then "$CUSTOM"/star69
0; exit 1 ; fi # report
# Status Query
if [ "$1" = "0" ] ; then "$CUSTOM"/chk_irlp
; exit 1 ; fi
# Speak the time
if [ "$1" = "1" ] ; then "$CUSTOM"/speaktime
; exit 1 ; fi
exit 0
A variation on the above lines is to use decode
xxxx for the command. For instance,
the line
if [ "$1" = "SA" ] ; then call stn3936 ; exit 1 ;
fi
to connect to 3936, could also read:
if [ "$1" = "SA"
] ; then decode 3936 ; exit 1 ; fi
But, using decode means you also have to include
any prefix you have defined in the environment file. So, if you had made
this change in your environment file:
export DTMFPREFIX=123
the line:
if [ "$1" = "SA" ] ; then decode 3936 ; exit 1 ; fi
would have to read:
if [ "$1" = "SA" ] ; then decode 1233936 ; exit 1
; fi
for it to work.
Also, the notimeout function won't work on
decode.
BACK to
last Menu
|
|
|
|
DHCP
Change
> I have 2 nodes. I need to swap my conections.
> I have one node DHCP and need to change it to a static IP and another
> node that has a static IP I need to change to DHCP. How do I do this?
The most *reliable* way is to edit one or
two files:
/etc/sysconfig/network-scripts/ifcfg-eth0
/etc/sysconfig/network
The first file contains most of the information,
except that the default gateway may only appear in the second file above.
If GATEWAY is in both files, make sure it is the same (or remove it from
one).
[Note: Don't do this remotely.
The first step will kill your access! (experience)-AGØN]
If you are on the console, you will then need to enter the following commands:
ifdown eth0
ifup eth0
A reboot will also do the trick. -Dave K9DC
Note: that's eth-zero, not letter O
Also be sure to check/change your port forwarding
on the router if you change IP addresses.
BACK to
last Menu
|
|
|
|
DNS
Address Location
The IP addresses for your DNS servers should
be found in the /etc/resolv.conf file. It may be set to your ISP's DNS,
or to your router's address.
BACK to
last Menu
|
|
|
|
Editing
Files Warning
You MUST be careful when editing scripts or
other files in the system to be sure that you don't inadvertently add
a return or linefeed to a long line. If you use an editor that wraps a
line, the file will probably not work.
Everyone develops their own preference for
editors, but the one that's included in the IRLP installation (Pico) works
fine for simple changes if you load it with wrap turned off. If, like
me, you prefer to do all of your editing from your Windows machine, Notepad
will work with word-wrap turned off. I prefer an old version of Ultra-Edit
as an all around whatever kind of file editor in Windows.
Using Pico, load it like this:
pico -w filename
In Notepad, check Format
and be sure that there's no check-mark beside Word
Wrap.
BACK to
last Menu
|
|
|
|
Enable-Disable
Node
Quick note. When I installed my node software,
the instructions didn't say anything about having to manually enable the
node the first time. I think it assumed the computer would be rebooted.
Being a total newbie, I had no clue why the node wouldn't work after install.
If this happens to you, reboot the computer and it should come up fully
operational. This should be a one time situation.
There are several ways to disable
and enable a node. One of them is provided in the stock custom_decode
file in the custom directory. You can control it via touch-tone from your
radio. It is rem'd out in the file, so all you have to do is edit the
file and remove the hash (#) marks at the beginning of the two lines below.
# if [ "$1" = "12001"
] ; then "$SCRIPT"/disable ; exit 1 ; fi
# if [ "$1" = "12002" ] ; then "$SCRIPT"/enable
; exit 1 ; fi
When done, it should look like:
if [ "$1" = "12001" ] ; then "$SCRIPT"/disable
; exit 1 ; fi
if [ "$1" = "12002" ] ; then "$SCRIPT"/enable
; exit 1 ; fi
The above lines allow you to dial 12001 to
disable the node and 12002 to re-enable it from your radio on the input
to the node. You may edit the custom_decode to change those codes to whatever
you want, as long as they don't conflict with other functions.
If you want to disable the node via the console,
as repeater:
disable
and:
$SCRIPT/enable
Note that the enable command can't be typed
directly as a single word like the disable command. That's because there
is another enable command that is unrelated and in the path. Type it as
above and it will work.
The node may also be disabled and re-enabled
in the cron file per a schedule. Some owners disable their node overnight,
turning it back on again in the early morning. To do this, you'll need
to get familiar with the workings of the cron file. I've added a section
on crons, however, I'll give you an example here that you can examine
and modify.
The proper way to add your own crons is by
adding a file in the custom directory (it isn't there by default) called
custom.crons.
Create the file.
As repeater:
cd custom
pico -w custom.crons
In that file, you might type two lines that
look like:
0 0 * * * (/home/irlp/scripts/disable &>dev/null 2>&1)
0 6 * * * (/home/irlp/scripts/enable &>dev/null 2>&1)
or:
45 23 * * * (/home/irlp/scripts/disable &>dev/null 2>&1)
30 6 * * * (/home/irlp/scripts/enable &>dev/null 2>&1)
In the first example, the node will be disabled
at midnight and re-enabled at 0600 daily. In the second example, the node
is disabled at 2345 and re-enabled at 0630. That should be enough to let
you come up with your own scheme.
In pico, write the file to disk with Control-O,
confirming the filename with a return, and then Control-X
to exit back to the command prompt. Make sure permissions
are correct with:
chmod 750 custom.crons
Trust me on that one. I'll do a section on
chmod later, when there's more time and I'm
more confident in my ability to do it justice.
After creating or changing the custom.crons
file, you'll need to reload the crons to import that new data into the
main crons list.
As repeater (node must
not be connected to another at the time):
update files
Check to see that the new lines are included
in the crons with:
crontab -l
Here's a trick, compliments of Jim Price,
WW4M. To enable the node silently (without the verbal announcement), add
the following line instead of the one in the examples above. Change the
time per your own needs.
0 6 * * * /bin/touch /home/irlp/local/enable
>/dev/null 2>&1
Also see Cron
Tips and Custom.crons.
BACK to
last Menu
|
|
|
|
File
Permissions & Ownership
What were they originally?
Be careful here. Read
AND UNDERSTAND the warning that I give right before the script
lines at the bottom of this section. If you don't, you might kill your
node!
Ever wonder what the default permissions and
ownership were set to so you can put them back when in doubt? While looking
through the reinstallation script, I found a section that sets ownership
and permissions for all of the files and folders after reinstalling them.
In order to be sure you have the latest information, you should pull the
latest reinstall script from the servers at the time you need them. Go
to the New-Installs
page and look for the re-install from backup
instructions. Scroll down in that document until you find the area that
reads something like Downloading the Reinstall Script
from the Server. Follow the instructions for downloading the reinstall
script.
After you have it, use WinSCP to copy it to
your PC and open it in a text editor or viewer. Scroll down near the bottom
of the file and look for #### Setting File Permissions
####. Below that line is the script that sets file and folder permissions.
I'll include what is in the current (June 9, 2005) version of the script,
but PLEASE do as above and get the LATEST information from the web site
in case Dave makes changes.
WARNING!
You need to be careful looking at this list to notice that some things
are changed more than once. For simplicity, a complete folder might be
set with permissions or ownership and later a specific file or files within
a folder changed (see rc.irlp and others). Be sure you understand what
is being done. If you give the wrong ownership or permission to a file,
your node may cease to work properly.
In the lines below, "$ID" is /home/irlp
chmod 660 "$ID"/audio/*
chmod 750 "$ID"/bin/*
chmod 750 "$ID"/scripts/*
chmod 750 "$ID"/custom/*
chmod 750 "$ID"
chown -R repeater.repeater "$ID"/*
chown repeater.repeater "$ID"
chmod 750 "$ID"/custom/rc.irlp
chown root.root "$ID"/custom/rc.irlp
chmod 750 "$ID"/custom/environment
chown root.repeater "$ID"/custom/environment
chown repeater.repeater "$ID"/.pgp
chown -R repeater.repeater "$ID"/.pgp/*
Again, get the most up to date information
from the latest reinstall script. Don't rely on what is above.
BACK to
last Menu
|
|
|
|
Hard
Drive Space
How much have I used,
how much is left?
df -h
BACK to
last Menu
|
|
|
|
Help-malformed
sysctl tree on free
What is this? Ignore it. It is known to the
software author and does no harm, other than bug us by being on the screen.
Get on with life!
From VE7LTD:
The problem here exists
with the /dev/parport driver in the Linux kernel. The DTMF process tries
to close any open "files" associated with the parallel port
when it starts.
The error is harmless, and
is well known to happen on ALL IRLP nodes, no matter what Linux OS it
is running, as long as it is running the Linux kernel.
Since the only reason that
DTMF is reset every call is to adjust the timeout values, the way this
error will be fixed it to change the way that the DTMF process reads and
writes files, and operates.
I have been working on this,
but since this error is not fatal or harmful in any way, it has not been
fixed.
Dave Cameron
BACK to
last Menu
|
|
|
|
IP of
remote node
Now and then, you might need the IP address
of a node that changes IP frequently. I administer a node that changes
IP address frequently. Quite often, I can't get the IP from the /custom/hosts
file because it is has changed since the file was updated. Normally, you
can get the IP address by simply logging onto your node's computer as
repeater and dialing up the node you need the IP for.
As repeater:
decode 1234
As it makes the connection, the IP address
of node 1234 will be displayed to you on the screen. The problem with
this is that you connect to him when you don't necessarily want or need
to. Why bother the owners or users when there's no need? There is a script
that will do the same thing without connecting. It is in the files
area on the IRLP Yahoo Group and is called
irlphost. Download the script and put it
in the /home/irlp/scripts directory. Note, this is a tar file. If you
have WinZip, it will extract the script for you.
See syntax example below.
As repeater:
irlphost 1234
Because the files in the /scripts directory
could be overwritten by updates, you really should put your non-stock
scripts in the /custom directory. Syntax for that path is below.
As repeater:
custom/irlphost 1234
BACK to
last Menu
|
|
|
|
Local
IP of Node Computer
Where is the (fixed) IP address of the node
stored?
/etc/sysconfig/network-scripts/ifcfg-eth0
If you change this address (fixed IP-not DHCP),
you must reload the network configuration.
As root:
ifdown eth0
ifup eth0
BACK to
last Menu
|
|
|
|
Locate
Command
Where the heck is that file?
Locate is a really useful command for finding
a file. If you don't know what directory the whizbang.xyz file is in,
simply type:
locate whizbang.xyz
A very helpful tip was just sent to me by
Dave, VE7MQ. Thanks, Dave. This is the kind of info I need on things that
I barely understand, and this probably explains why locate has sometimes
not worked for me.
The 'locate' command uses
a built-in database of all files on the system. However, this database
is only updated once per day, by default. Thus, a new file will not be
found by 'locate' until after the daily update has occurred. To do a manual
update, as root, type: 'updatedb'. [The
update is triggered by one of the root crons.]
BACK to
last Menu
|
|
|
|
Locking
out a node
Locking out a node is not to be taken lightly.
To quote from the Unofficial
Manual: "This method should be used as a last resort, as it is
not in the spirit of IRLP to lock out a node without reason. Nodes found
locking out all nodes but a precious few will be asked to remove themselves
from the IRLP general system and be added to a private system." However,
if you feel you must, it is easily accomplished. Be aware that a lockout
blocks connections both to and from the node
you lock out.
To lock out a node or prevent connection to
a reflector, create a file called lockout_list
in the custom directory. As before, you can create the file with your
favorite text editor. In the file, will be a list of nodes and/or reflectors
to be locked out of your node. Nodes are listed by stnxxxx, where xxxx
is the node number. Reflectors are listed as refxxxx, with xxxx being
the reflector number. The following example will use pico to create a
lockout for nodes 1234 and 4321, and reflector 9000. There's a carriage
return after each node/reflector number.
As repeater:
pico -w /home/irlp/custom/lockout_list
stn1234
stn4321
ref9000
The -w isn't a necessity in this case (no
long lines), but it's good to stay in the habit of using it for those
times when it is. Save the file with Control-O,
confirm the filename, and exit pico with Control-X.
If your node happens to be one that isn't
allowed on reflectors because you haven't taken steps to remove carrier
tails, IDs, courtesy tones, or pulseback, you might want to lock yourself
out of all reflectors. This can be done by using the keyword ALLREF
instead of trying to list them all.
BACK to
last Menu
|
|
|
|
Node
Number Swap
(between two nodes)
> One of several nodes I built needs to
change node numbers with another
> node. I know I must copy the pgp.keyrings over, but what else?
You need to swap two files from each node.
Both are located in
/home/irlp/.pgp/
The first is secring.pgp
which is the actual secret portion of the key pair (and technically the
only one that needs to be swapped) Plus the ascii version of public key
stnXXXX.asc where XXXX is your node number.
This needs to be moved simply because it is unique to your node and provides
an easy way to look up the KeyID should it be necessary. There may be
backup (.bak) versions of each file. You can just delete those.
In addition, you will need to swap change
stn numbers in the environment file (you
can edit this change in). If one of the node numbers ends in zero, be
sure to note whether that node number is 3 or 4 digits long (stn473 or
stn4730 as an example). It must be replaced in the environment file in
the exactly the same format. The reason for this oddity is legacy node
numbers were 3-digits long, but as the installs team has been doing re-installations,
we have been changing 3-digit node numbers to 4-digits when creating new
keys, so there are some of each.
-Dave K9DC
BACK to
last Menu
|
|
|
|
Password
Change for User
You'll probably get tired of reading this
over and over, but do
set a secure password for your IRLP Linux box. You should have
at least two logins and passwords, one each
for root and repeater.
See below.
Password changes: log in as the user whose
password you want to change and type
passwd
You can change any user's password on the
system while logged in as root.
Example as root:
passwd repeater
Then answer the questions to supply a new password for user repeater.
You should check your node to see if you have
a password specified for user repeater. The
RH9, IRLP 4.03 version of the installation did not do this by default.
You could only login as root and then su
- repeater. If you can't login as repeater, you should correct that.
Root and repeater should have different passwords,
and it is recommended that the root password be more
secure, harder to guess/crack. User repeater only has limited access
to the system and you can setup an easier to remember password for it.
Setup a repeater password as above. Then, don't login as root unless you
have to have access to specific root items.
What's makes a password secure? Is it easy
to remember, made up of words or a phrase? Then it isn't very secure.
For security, a password should have both alpha and numeric, as well as
both upper and lower case letters in it. And, the longer it is, the harder
it will be to crack if someone wants to try.
BACK to
last Menu
|
|
|
|
Pulsecheck
As repeater:
pulsecheck
or:
$SCRIPT/pulsecheck
BACK to
last Menu
|
|
|
|
Pwd
Or, where the heck am I?
Type:
pwd
You'll see your current directory path. Also
see CD.
BACK to
last Menu
|
|
|
|
rc.irlp
reloading
Reloads IRLP software without rebooting the
operating system.
As root:
/home/irlp/custom/rc.irlp
BACK to
last Menu
|
|
|
|
ReadInput
Monitors what your node internals are doing.
See what touch-tone digits are dialed, when PTT, COs, and Auxiliary functions
are active. Very useful for checking proper operation of all of those
functions.
As repeater:
readinput
Use Control-C
to exit the readinput program.
BACK to
last Menu
|
|
|
|
Reboot
IRLP Computer
As root:
shutdown -r now
Also, as root:
use Control-Alt-Delete
Also see shutdown
command and reboot, should I?
BACK to
last Menu
|
|
|
|
Reboot
*Should
I?
Some people like to brag that they haven't
rebooted their IRLP box for x months or y years. Is this safe?
While Linux is very stable and you can run
a system that long without rebooting, there is legitimate reason to reboot
now and then. At 0300 every night, your node goes out and grabs updates
from the servers. To use some of Dave Cameron's own words, "When
shared libraries, like glibc are updated, the programs that use these
libraries have to be restarted to apply the update. The easiest way to
do this is to simply reboot the machine. I am not suggesting a reboot
after every update, but boasting a 300 day uptime does not always boast
good security." (Thanks for the clarification, Dave.) Restarting
your node now and then will assure that any updates received will run.
Also see Reboot IRLP Computer.
*Late
note on this. I received a note from someone who hadn't rebooted his FC3
IRLP/EchoIRLP node for a long period and thought he would give it a try
after reading the above paragraph. The node did not fully reload for him
when it came back up. At this point, we don't know whether it had to do
with the fact that he also had EchoIRLP on the system, or if it was just
because it probably had lots of changes taking place due to lack of prior
rebooting. A file may be corrupt or something. I'll clarify this if it
is ever resolved.
Also know that there is NO support for running
EchoIRLP from the IRLP installs team. You're on your own if you choose
to run it.
DO backup your
system now and then. You can copy the /home directory and all its contents
to your Windows computer if you like, and/or you can run the backup_for_reinstall
script. I do both.
BACK to
last Menu
|
|
|
|
Remote
Root Login
Preventing Direct Login
It has been suggested that you should prevent
direct remote login by user root when using
port 22 for ssh. Instead, you should login as repeater and then su - root.
To disable direct remote login to root, edit the /etc/ssh/sshd_config
file. Change the line PermitRootLogin as below.
As root:
pico -w /etc/ssh/sshd_config
Drop down to line 36 (on mine) and find the
line that might read:
#PermitRootLogin yes
That's how it reads in my file. Simply uncomment
the line (remove the #) and change the yes to no. Then, Control O and
Control X to save and exit pico. You'll need to restart sshd for it to
take effect.
As root:
service sshd restart
or:
/etc/init.d/sshd restart
or, just reboot the computer.
Note: If you disable remote
root login, you will also disable your ability to login as root with WinSCP,
which will hinder your ability to administer your node in some cases.
Also see SSHD Port
Change
BACK to
last Menu
|
|
|
|
Restore
From Backup
When/if you want to upgrade from say RH9 to
FC3, you need to backup your node per the
usual instructions. Make sure that you put a copy of the irlp_backup.tgz
file on your Windows computer so it isn't lost during the new install.
Reinstalling your node software from the irlp_backup.tgz
file can probably be done by using WinSCP to move the .tgz file from your
Windows machine to the /tmp directory on the node computer, and then uncompressing
the files. However, it is recommended that you follow the instructions
on the new-install
page instead. Locate the category that
says "reinstall from a backup".
Those instructions are supposed to be the latest available and designed
to reinstall from a backup, or reinstall after upgrading the OS.
Follow the instructions on that page. You will download the most up-do-date
reinstall script from the IRLP servers and use it to properly restore
the node software.
BACK to
last Menu
|
|
|
|
Screen
Blanker/Saver
Control over the screen blanker can be done
with the setterm command.
As root:
setterm -blank 5
This will set the blanker timeout at 5 minutes.
A range of 0-60 is accepted, so substitute the number you prefer. Zero
disables the blanker.
BACK to
last Menu
|
|
|
|
Script
not working?
New script installed but doesn't work.
I discovered something recently that solved
a few mysteries. After downloading a couple of new scripts from someone,
I couldn't get them to run. Permissions and ownership were correct, they
just wouldn't work. I might get a file not found, or bad interpreter error.
I use WinSCP and Ultra-Edit for looking at
and editing files most of the time. I found that by adding a simple #
comment line to one of the files and saving it made it work. I then took
the # comment line back out and it still worked. WTF? The only thing I
can figure is the old caveat that you hear from the old-timers is indeed
correct. Stuff that comes through the Windows world can sometimes get
modified in a way that is invisible without a hex-editor and fails to
work afterward. When I loaded the script and added the comment, Ultra-Edit
simply cleaned it up and then it worked. As an experiment to prove that
point, I opened the second "broken" script with pico -w and
resaved it (Control-O). I did not edit the file, just opened, resaved,
exit. It worked. Note that just opening the file for inspection won't
clean it up. You have to actually resave the file. That's why opening
it in Ultra-Edit while looking for the error didn't fix it. I actually
had to make a change so that the file would be rewritten. The same is
accomplished in pico by Control-O without editing anything.
BACK to
last Menu
|
|
|
|
Shut
Down IRLP Computer
As root:
shutdown -h now
Also see reboot
command.
BACK to
last Menu
|
|
|
|
SSHD
Port Change
The default sshd port (used to remotely access
your node computer) is port 22. Port 22 is well known, and subject to
unauthorized login attempts by all kinds of people trying to find an unprotected
place to play around. I was advised when I got started to move the sshd
port to some other port. I also discovered that my ISP is blocking port
22 for security reasons. By the way, it goes without saying, you should
be using a secure password. Don't make it easy for someone to compromise
your system.
As root:
CD /etc/ssh
pico -w sshd_config
Look for the line that says #Port
22. On mine, that's line 13.
Remove the # and change the 22 to something
of your choosing, so it looks like:
Port 12345
Use Control-O
to save the file and then Control-X to exit
the pico editor.
The above change tells sshd to listen on port
12345 for connections.
Finally, restart sshd:
service sshd restart
or:
/etc/init.d/sshd restart
Don't forget to change the
port forwarding in your router to reflect the new port that needs to be
forwarded to your node computer. If you don't, you won't make it in when
you try to remotely administer your node.
More sage advice from K9DC:
Actually, you should just
do a 'service sshd restart' command and then test it before disconnecting
your current session.
The 'service sshd restart'
only affects new sessions and will NOT disconnect your current session.
So just in case it doesn't work (typo, router port forward not set up,
etc) you have a way to correct it before locking yourself out. [we've
all done it, the further away from your node you are, the more likely
it is to happen <sigh>]
You can also list multiple
ports if you need sshd to listen on more than one.
-Dave K9DC
To do multiple ports as Dave suggests above,
edit the file to add extra port lines as below.
Port 22
Port 12345
Doing this would allow (for instance) blocking
port 22 on your router while passing port 12345 to the node box for remote
access. Port 22 could be used on your LAN and not change the configuration
of programs like Putty and WinSCP.
BACK to
last Menu
|
|
|
|
su or su
-
How to switch (set) users
The su command can be used to temporarily
"become" another user. If you are logged in as repeater and
need to do something as root, no need to exit and relog. Just su root.
If you use the -, you have all rights of that user, as if you are that
user. You'll log in and have access to everything in his home directory.
Examples below.
As repeater:
su - root
Logs you in as root and loads the environment for user root.
As root:
su - repeater
Logs you in as repeater and loads the environment for user repeater.
To log out, simply type exit. This will take
you back to where you came from (but isn't teleportation).
BACK to
last Menu
|
|
|
|
Tail
Command
Monitor a log in realtime
The tail command reads the last 10 lines of
a file. By adding a command line switch, it will continue to output new
lines as they appear in realtime.
As repeater:
tail /home/irlp/log/messages
will read the last 10 lines of the file and then exit to prompt.
But, by adding a -f switch, you can watch
the node's log file activity in realtime.
As repeater:
tail -f /home/irlp/log/messages
Use Control-C
to exit the tail program.
More than 10 lines can be read by adding another
command line switch.
tail -f -n20 /home/irlp/log/messages
will read the last 20 lines of the file and then keep running to read
realtime input.
Other logs
can be monitored the same way
(such as system log - as root: tail -f /var/log/messages)
In case you should need it, you can read the
first 10 lines of a file with the
head command, same syntax as above for reading
more than 10 lines.
(As repeater: head -n20 /home/irlp/log/messages to read the first 20 lines
of the log)
BACK to
last Menu
|
|
|
|
Timeout
Timer Changes
And how to disable
There are two timeout timers to be concerned
with. To change them, edit the appropriate file. A value of zero equals
no timeout. Read the warning at the bottom
of this section.
The node-to-node timer
is defaulted to 240 seconds (4 minutes), and is located in
/home/irlp/custom/timeoutvalue
The node-to-reflector
timeout is defaulted to 1200 seconds (20 minutes) in
/home/irlp/custom/environment
Change the line that reads export REFLECT_TIMEOUT_VALUE=1200
Reload rc.irlp after you edit the file(s)
so the change(s) will take effect immediately.
As root:
/home/irlp/custom/rc.irlp
There's something to remember about the activity
timeout timer during a node-to-node connection. Either
side can timeout the connection (see notimeout function below). If your
timer is set at 30 minutes, and the timer on the far end is set at 10
minutes, the shorter one will control the link, no matter what activity
there is on the side of the longer one.
There are two other
timers to be aware of in the system. Both are locked by the program
author. The COs and PTT will time out at 4 and 5 minutes respectively
if either of them is locked on. On my 4.03 IRLP installation, the COs
timer also breaks the connection. There is a secondary timer that says
the COs must go away for more than 1 second before it resets, according
to "The Unofficial Manual". But on mine, it appears to be more
like 5-10 seconds before you can reconnect. The PTT timer will drop the
PTT line (your transmitter) when it times out, and reset when whatever
is causing the PTT action goes away.
To disable the activity timeout timer for
a specific connection to a reflector, you
can put an entry in the custom_decode file
to call that reflector with disabled timeout. Read
the WARNING at the bottom of this section!
The following line in the custom_decode file
will connect to the 9250 reflector with no timeout using Touchtone #A.
if [ "$1" = "PA" ] ; then
"$SCRIPT"/connect_to_reflector ref9250 notimeout ; exit 1 ;
fi
You can also use the notimout option in your
custom.crons file. To connect to the 9250
reflector with no activity timeout each morning at 0800, the line would
look like:
0 8 * * * ("$SCRIPT"/connect_to_reflector
ref9250 notimeout > /dev/null 2>&1)
If you want to use the notimeout function
for specific node-to-node connection in your
custom_decode or custom.crons
file, you can use the call stn1234 notimeout
command in place of the connect_to_reflector refxxxx notimeout command.
Note, even though the far side station might have a timeout timer, the
notimeout function disables it on both
ends. Again, read the warning below.
As above, if you want to connect to node 1234
with no timeout using Touchtone #A, you could have an entry in custom_decode
that looks like:
if [ "$1" = "PA" ] ; then
"$SCRIPT"/call stn1234 notimeout ; exit 1 ; fi
See custom.crons
for more detail on using crons.
WARNING! Do not connect to
any node/reflector using the notimeout option without permission of the
node/reflector owner! You could find yourself locked out.
BACK to
last Menu
|
|
|
|
Troubleshoot-IRLP
Make sure node is disconnected.
As repeater (and demonstrating different ways
to access the scripts folder):
./scripts/troubleshoot-irlp
Note the period at the beginning of that line.
or:
$SCRIPT/troubleshoot-irlp
or:
scripts/troubleshoot-irlp
or:
troubleshoot-irlp
BACK to
last Menu
|
|
|
|
Wave
Files
Uploading Custom Wave Files To IRLP Server
Note: Upload your link-on/off files to the
/tmp directory or have them on a floppy disk
on the node computer. They MUST be the proper format, see detail in "What
to do after Installation" instructions.
As root:
/home/irlp/scripts/send_wave_files
Audio files will be automatically deleted
from the /tmp directory after upload. Be sure to keep a backup on the
floppy, or elsewhere.
BACK to
last Menu
|
|
|
|
WinSCP,
Putty, What's The Fuss?
WinSCP is a godsend for those of us coming
into this from the world of Bill Gates. If you're running an IRLP Node
on a LAN with your Windows based home computer(s), you will love it. WinSCP
is a split screen file manager that uses SSH to communicate with your
node and allows you to do file management on your node from Windows. Download
and install it on your Windows machine. To copy a file from one computer
to the other, just double click on it. To edit a file with your default
editor, right click the file and click the Edit button.
While you're at it, you might as well get
Putty,
if you haven't already. Putty allows you to be at your Windows computer
and remotely login to your node computer (again using SSH), as if you
were sitting right in front of it. Putty.exe is the whole thing. There
isn't any installation involved. Just put it in a directory, make a shortcut
to it, and run it. You'll need to configure it similar to WinSCP.
At this point, my original instructions said
to go to the new-installs
section and click on the link that says "reinstall
from a backup". The early part of that document tells you
how to setup WinSCP. Install it with the Commander
Interface so you can see both computers at the same time.
Instead of sending you there, I've pulled
those instructions into this document, captured new screen-shots, and
modified them here and there for clarity. Feel free to use the original
instructions, if you like, or continue below.
Except for the images, most of what's below
is copied directly from the above mentioned document. I've clipped out
the "get it from here" links, because they link to an older
version of the program and no longer work. I've also taken the liberty
of making minor wording changes and additions for clarity.
Once you have the WinSCPsetup program on your
windows computer, double click it and let it install. When you start WinSCP,
you should see a screen like this:
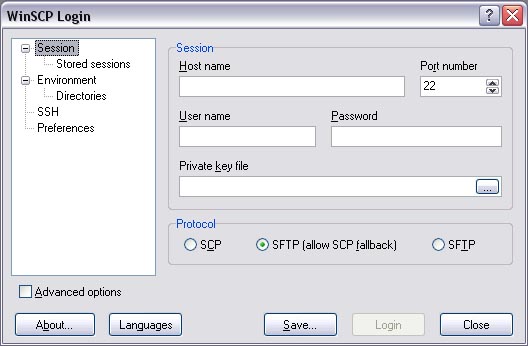
If your node is behind the same firewall as your windows computer, the
host name you enter will be the actual IP address of the network card
in the node. The IP address can be seen by logging into the node (as root
or repeater) and typing:
/sbin/ifconfig eth0
The line you're looking for should read something
like:
inet addr:192.168.0.50 Bcast:192.168.0.255
Mask:255.255.255.0
In the example above, 192.168.0.50 is the
node's LAN IP address, and will be used for access by WinSCP (or Putty)
from behind the same firewall.
If your node is behind a separate firewall
from your Windows computer, you will need to know the public IP address.
You can find that by logging into the node (as root or repeater) and typing:
telnet server3.irlp.net 10000
The IP address you receive from either method
above must be entered in the host name field
in WinSCP and change the port number to whatever
you're using for SSH. Type in repeater as your user
name. Put your password for user repeater in the Password
field. You can also use root and root's password if you don’t know
your repeater password. See passwd to
install a repeater password if you haven't done it yet. In reality, while
I usually login as repeater for safety, I configure both a root and repeater
login for WinSCP so that I can work on whatever I want remotely. Use repeater
login for routine node maintenance. Before you click on login,
save the configuration so you don't have to do it again the next
time you use it.
The opening screen might look something like
this after you configure a repeater and root user login.
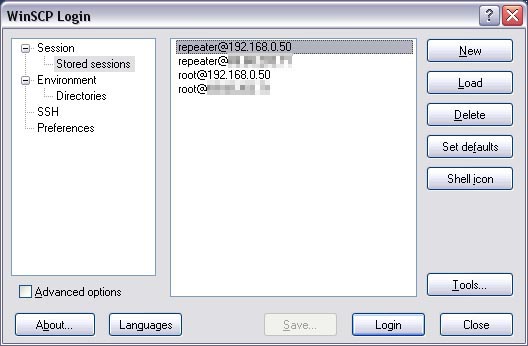
In this case, I have two
nodes in the configuration, one is my own, inside the LAN, and a second
one in another city.
When you click login and a connection is made
with your node, you may get a Windows pop-up about adding the "key".
Click Yes. This will happen for any first time login to a specific address.
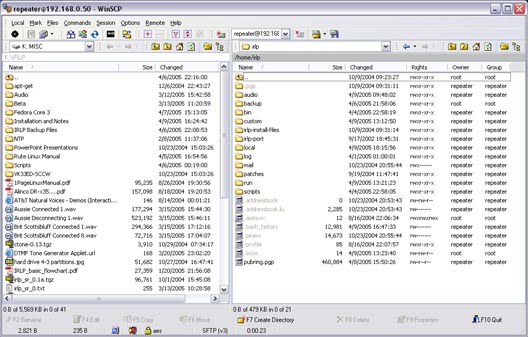
Double clicking on any of them establishes
the connection and will open to show you something like below (shrunk
for web display). When you're logged in, you will see your local computer
on the left side, and your node on the right (in Commander mode). You
should use Windows Explorer to make a directory for your IRLP stuff on
your Windows machine. In WinSCP, navigate to that directory (double click
it) so you can see inside it on the left part of the WinSCP window. Then,
save that session by going up to the blue floppy
disk icon on the right end of the tool bar and clicking it. You
may also use Alt-S for session, and choose
Save Session. By saving with the same configuration name, the window will
open up to the same directories the next time you run the program.
The Putty configuration is similar to WinSCP,
except that you only configure once per address. You'll login as repeater
or root, just as you would from the local console.
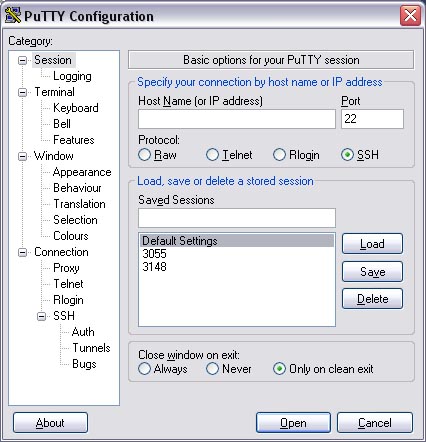
When you load the program for the first time,
you should see something similar to the screen below, with only the Default
Settings entry showing. Put the IP address for the node in the Host
Name box, change the port number to
whatever you're using for SSH, give it a name (such as the node number)
in the Saved Sessions box, and then click
Save.
Double click the name in the lower box and
it will open to a new DOS-like window. When it establishes connection,
you'll be greeted with a login prompt, just like on the console. When
done, logoff the far end the same as you would if you were at the console,
using the logout or exit
command. The window should close, but on my system, the window
only closes as it should part of the time. If it doesn't close on its
own, just hit the X to close it.
BACK to
last Menu
|
| |
| |

 Избранные действующие эхолинки (23) -->